You can pressure wash an asphalt driveway safely at 2000 to 3000 PSI using a wide 25 to 40 degree nozzle held 8 to 12 inches off the surface. Move in steady overlapping passes, never linger in one spot, and skip narrow zero degree tips. Done right, it is the best prep before sealcoating.
What PSI is safe for asphalt?
Asphalt is held together by a sticky petroleum binder that coats the stone aggregate. Hit it with too much focused force and you wash that binder away, leaving loose gravel and a rough, pitted face. The safe window for most residential driveways is 2000 to 3000 PSI. That is enough to break up oil film, ground in dirt, moss, and algae, but gentle enough that the surface stays intact when you also control distance and nozzle width.
If your machine puts out more than 3000 PSI, that is fine. You simply back the wand farther away and use a wider tip so the energy spreads out before it reaches the asphalt. Pressure at the surface drops fast with distance, so a 3200 PSI unit held 18 inches back hits softer than a 2000 PSI unit held 4 inches away. Older, unsealed, or already crumbling asphalt is more fragile, so start gentle and test a small corner first. If you see stone breaking loose, ease off.
The right nozzle and distance
Nozzle choice matters more than raw PSI. Pressure washer tips are color coded by spray angle, and a narrow angle concentrates all the force into a tiny line.
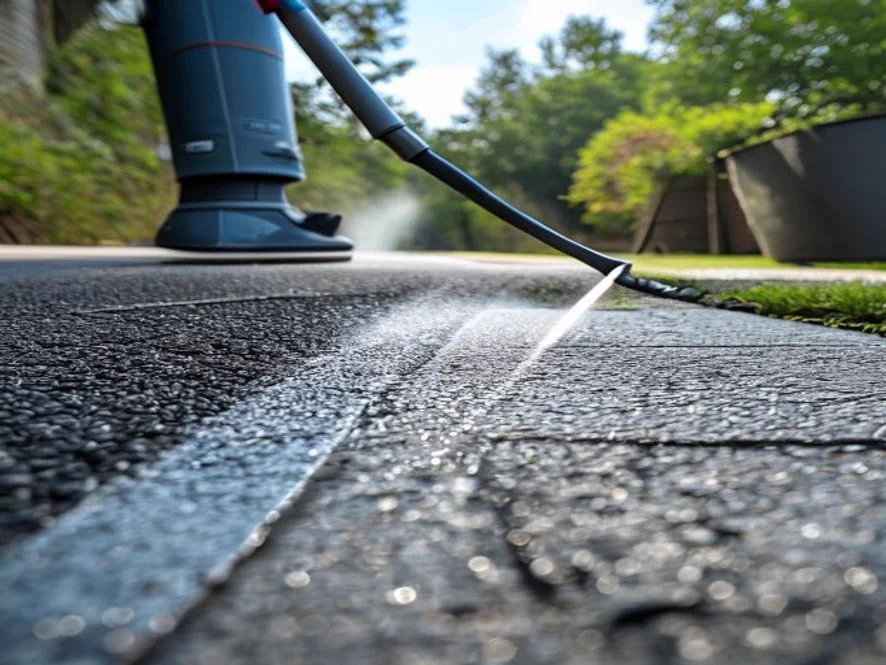
- 25 degree (green): The workhorse for asphalt. Strong enough for general grime and oil, wide enough to be safe.
- 40 degree (white): Best for light cleaning, final rinses, and fragile or older driveways.
- Surface cleaner attachment: A round spinning disc with two shrouded tips. It gives the most even, streak-free result and is the easiest tool for large driveways.
- 0 degree (red) and 15 degree (yellow): Avoid these on asphalt. The red pinpoint tip will carve a groove and strip binder in one pass.
Keep the tip 8 to 12 inches from the surface and angle the wand slightly so the spray pushes debris ahead of you rather than blasting straight down. Hold a consistent height. Dipping the wand closer in one spot leaves a visible clean stripe and can damage the surface there.
Do's and don'ts
A few simple habits separate a clean driveway from a damaged one. The Asphalt Pavement Association notes that surface cleaning and timely sealing keep the binder protected and extend pavement life, so treat washing as maintenance, not a one-time scrub.
- Do sweep and remove debris first. Loose leaves and gravel turn into projectiles and clog your drain.
- Do pre-treat oil and grease. Apply a degreaser, let it dwell, then wash. For stubborn spots see how to remove oil stains from asphalt.
- Do work in sections and keep the wand moving in overlapping passes so you do not over-clean one area.
- Do plan your runoff. Dirty water with detergent should not flow into storm drains. The EPA recommends directing wash water to a grassy area or a drain that leads to treatment.
- Don't use a zero degree tip, hold the wand within a few inches, or pause on one spot.
- Don't wash freshly laid asphalt. New pavement needs months to cure, so check our curing time guide before you spray.
- Don't wash in freezing temps when water can refreeze in cracks and widen them.
Quick tool
PSI and Tip Picker
Tell us your machine and driveway age. We will suggest a safe tip, distance, and pressure starting point.
Step by step technique
Working in a logical order keeps the result even and the runoff under control.
- 1. Clear the surface. Sweep off leaves, gravel, and debris. Pull weeds growing in seams. If cracks are sprouting growth, fix them after washing using our guide to weeds in driveway cracks.
- 2. Pre-treat stains. Spray degreaser on oil spots and a moss or algae killer on green patches. Let it dwell 5 to 10 minutes. Do not let it dry.
- 3. Apply detergent low. Use the soap nozzle to lay down cleaner from the bottom of any slope upward, then let it sit a few minutes.
- 4. Rinse top down. Switch to the 25 degree tip or surface cleaner and wash from the high end downhill so dirty water flows away from clean sections.
- 5. Overlap your passes. Cover each stripe by about a third so you do not leave clean and dirty bands.
- 6. Final rinse and dry. Rinse edges and any detergent residue, then let the asphalt dry fully before sealing or driving on it.
When to wash and why timing matters
Spring is the most common time to pressure wash, after winter salt, sand, and grime have built up. It is also the natural first step on any maintenance checklist. If you are mapping out the year, our maintenance schedule shows where washing fits between crack filling and sealing.
Pick a dry day with temperatures above 50 degrees so the surface dries quickly. Avoid washing right before rain if you plan to seal, because asphalt must be bone dry for sealer to bond. Most surfaces need 24 to 48 hours to dry fully after a thorough wash, longer in humid or shaded spots. If your driveway also has green growth returning every season, treat the root cause covered in our moss and algae guide so it does not come right back.
Pressure washing before sealcoating
The single best reason to pressure wash is prep for sealcoat. Sealer only bonds to a clean, oil-free surface. Dust, grit, and grease act like a release layer and cause the new coat to peel within a season. A proper wash strips all of that and opens the surface up.
After washing, fill any cracks, let everything dry for a day or two, then seal. Walk through the full process in our sealcoat prep guide and figure out coverage with the asphalt sealer calculator. If you are weighing whether sealing is even worth the effort this year, the is sealcoating worth it breakdown lays out the numbers.
Bottom line
Pressure washing asphalt is safe and effective when you respect the binder. Stay at 2000 to 3000 PSI, reach for a 25 or 40 degree tip, keep the wand about a foot back, and never park the spray in one place. Sweep first, pre-treat stains, work top to bottom, and let it dry. Do that and you get a clean, even surface that is perfectly primed for your next sealcoat.